
The Ultimate Premium Pistachio & White Chocolate Macarons Masterclass
Section 1: Introduction and Culinary Philosophy
Welcome to the definitive guide to crafting one of the most elegant, visually breathtaking, and technically rewarding confections in the world of high-end French pastry: The Premium Pistachio & White Chocolate Drip Macarons. Macarons are far more than a simple sweet treat; they are a delicate science experiment, a test of patience, and an artistic canvas all rolled into one.
When done right, a macaron offers an incredible contrast of textures—a perfectly smooth, paper-thin, crisp outer shell that gives way to a deeply chewy, moist interior, brought together by a rich, velvety filling. In this recipe, we take this classic pastry to a luxurious new level by combining the earthiness of authentic pistachio paste with the smooth sweetness of white chocolate, finished with a beautiful, modern cascading chocolate drip.
Whether you have struggled with hollow shells in the past, or you are looking to master the highly reliable Italian Meringue method, this detailed guide will walk you through the precise physics and chemistry required to achieve bakery-level perfection.
Section 2: Deep-Dive Component Analysis
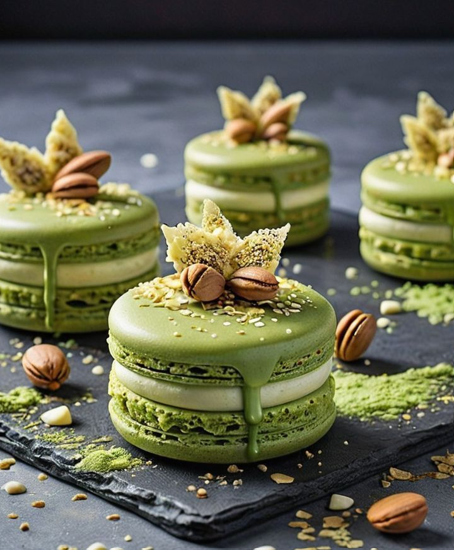
To recreate the stunning visual and flavor profile seen in the image, we must break down this masterpiece into its three essential pillars:
1. The Shells: Pistachio-Almond Macaron Caps
Traditional macaron shells rely entirely on almond flour. However, to inject maximum natural flavor into the shell itself, we substitute a portion of the almond flour with ultra-fine, pure ground pistachios. This gives the shells an authentic, nutty depth and a subtle, natural olive-green baseline before adding a touch of premium food coloring to vibrant-up the presentation.
2. The Core: White Chocolate Pistachio Ganache
Instead of a simple buttercream, which can often be cloyingly sweet, we utilize a professional-grade white chocolate emulsion. By infusing high-quality white chocolate couverture with a pure, 100% sugar-free pistachio paste and a touch of sea salt, we create a silky, stable filling that cuts through the sweetness and allows the true flavor of the Sicilian pistachio to shine.
3. The Finish: Green Chocolate Drip & Textural Garnishes
What elevates this specific macaron is the artisan decoration. A carefully tempered, oil-blended white chocolate drip mimics a cascading glaze. It is anchored by a crown of finely shaved white chocolate shards (shaped like delicate leaves), chopped toasted pistachios, and a dusting of fine pistachio flour to mimic a forest-floor aesthetic.
Section 3: The Science of Macarons & Troubleshooting
Before weighing your ingredients, it is vital to internalize these three rules of pastry science:
- The Importance of Sifting: Both almond flour and pistachio flour naturally contain high amounts of oils. If you over-process them in a food blender, they will turn into nut butter. Process them briefly with the powdered sugar to absorb moisture, then sift multiple times. Any large particles left behind will ruin the smooth surface of your shells.
- The Magic of the Italian Meringue: While the French method (whipping raw egg whites with sugar) is simpler, the Italian method (pouring a 118∘C boiling sugar syrup into whipping egg whites) creates a structurally superior, highly stable meringue. This drastically reduces the chances of your shells cracking or deflating in the oven.
- The Skin / Rest Phase: After piping your circles, you must let them sit at room temperature until a matte skin forms on top. When touched lightly with a clean finger, the batter should not stick to you. This skin forces the steam to escape from the bottom of the shell during baking, creating the classic, beautiful “feet” (le pied) at the base of the macaron.
Section 4: Ingredients List
Weight Precision Warning: This recipe uses metric grams. Macarons are highly sensitive to moisture and volume variations; standard cup measurements will not yield consistent results.
Part A: Ground Pistachio Macaron Shells
- 150g Premium Almond Flour (Super-fine, blanched)
- 50g Pure Pistachio Flour (Finely ground from raw, unsalted pistachios)
- 200g Powdered Sugar (Icing sugar, containing no more than 3% starch)
- 200g Granulated White Sugar (For the sugar syrup)
- 50ml Standard Water (For the sugar syrup)
- 150g Egg Whites (Divided into two separate portions of 75g each; aged at room temperature)
- 3g High-Quality Green Gel Food Coloring (Avoid water-based liquid coloring)
Part B: White Chocolate Pistachio Ganache Filling
- 250g Premium White Chocolate Couverture (Min. 32% cocoa butter, chopped fine)
- 120ml Heavy Cream (Minimum 35% milk fat)
- 60g 100% Pure Pistachio Paste (Unsweetened)
- 30g Unsalted Butter (European style, softened to room temperature)
- A small pinch Fine Sea Salt
Part C: The Chocolate Drip & Top Decoration
- 100g White Chocolate (For melting)
- 20ml Heavy Cream (To thin the drip consistency)
- A tiny drop Green oil-based food coloring (specifically formulated for chocolate)
- 15-20 Whole raw pistachios (coarsely chopped for the top garnish)
- 50g Shaved white chocolate curls or leaf flakes
Section 5: Step-by-Step Instructions
Step 1: Processing and Sifting the Dry Base
- In a large food processor, combine your 150g of almond flour, 50g of pistachio flour, and 200g of powdered sugar.
- Pulse the machine in short, 2-second bursts about 5 to 6 times. Do not over-process, or the pistachios will release their oils and clump together.
- Pass this mixture through a fine-mesh sieve into a large glass bowl. Discard or re-grind any large nut pieces that refuse to pass through the sieve. Your final powder should look like ultra-fine, lightweight dust.
Step 2: Preparing the Italian Meringue
- Place your first batch of 75g of egg whites into the perfectly clean, grease-free bowl of a stand mixer fitted with the whisk attachment.
- In a small, heavy-bottomed saucepan, combine the 200g of granulated sugar and 50ml of water. Place over medium heat and insert a digital candy thermometer. Do not stir the sugar; let it come to a clean boil.
- Once the sugar syrup inside the saucepan climbs to 115∘C (239∘F), turn your stand mixer onto medium-high speed to begin whipping your egg whites to soft peaks.
- The moment the sugar syrup hits exactly 118∘C (244∘F), immediately remove the saucepan from the heat.
- With the mixer running at high speed, slowly and carefully pour the hot sugar syrup down the inside wall of the mixer bowl in a thin, steady stream, avoiding the spinning whisk wires to prevent splattering.
- Continue whipping on high speed for about 7 to 10 minutes. The bowl will feel very hot at first but will cool down to room temperature. The meringue is ready when it is incredibly glossy, thick, and forms stiff, sharp peaks when the whisk is pulled out.
Step 3: The Art of Macaronage
- Take your remaining 75g of unwhipped, raw egg whites and pour them directly over your sifted nut and sugar mixture from Step 1. Add your 3g of green gel food coloring right on top. Mix with a firm rubber spatula until it forms a thick, uniform paste.
- Add one-third of your prepared Italian meringue to this paste. Fold it aggressively to loosen up the thick texture of the nut paste.
- Gently fold in the remaining two-thirds of the meringue in two stages. Now, begin the true macaronage stroke: scrape down the sides of the bowl, then press the flat side of your spatula right through the center of the batter against the side of the bowl to knock out excess air.
- Stop and check the consistency frequently. The batter is perfectly mixed when it falls off your lifted spatula in a slow, continuous, glossy ribbon that holds its shape for 10 seconds before slowly melting back into itself. It should look like flowing volcanic lava.
Step 4: Piping, Resting, and Baking
- Line a heavy, flat baking sheet with a premium silicone macaron mat or high-quality parchment paper.
- Transfer your green batter into a large pastry bag fitted with a medium round piping tip (approx. 8mm to 10mm).
- Hold the bag completely vertical, about 1 cm above the baking sheet, and pipe circles roughly 4 cm in diameter, leaving plenty of space between each shell.
- Lift the baking sheet up and slam it firmly down onto your countertop 3 to 4 times. This forces any trapped air bubbles to rise to the surface and pop, preventing hollow centers.
- The Rest Phase: Leave the piped shells sitting out on your counter for 30 to 50 minutes. The exact time depends on the humidity in your room. They are ready when they develop a completely matte, dry skin. You should be able to run a finger across the top without any batter sticking to you.
- Meanwhile, preheat your oven to 140∘C (285∘F). Bake the macarons one tray at a time on the middle rack for 14 to 16 minutes. You will see their beautiful “feet” rise within the first 5 minutes.
- Remove from the oven and let the shells cool completely on the tray before attempting to peel them away from the mat.
Step 5: Emulsifying the Pistachio Ganache
- Place your 250g of finely chopped white chocolate into a heatproof glass bowl.
- In a small saucepan, bring the 120ml of heavy cream and 60g of pure pistachio paste to a bare simmer over medium heat, whisking until the paste is completely incorporated into the cream.
- Pour the hot pistachio-infused cream directly over the white chocolate. Let it sit untouched for 2 minutes to allow the residual heat to melt the cocoa butter.
- Add a tiny pinch of sea salt and use an immersion blender to mix the ganache from the center outward until it transforms into an incredibly shiny, homogeneous emulsion. Stir in the 30g of softened butter.
- Cover the surface of the ganache directly with plastic wrap (touching the liquid to prevent a skin from forming) and place it in the refrigerator for at least 2 hours, or until it reaches a firm, pipeable thickness.
Step 6: Assembly and Masterpiece Decoration
The Maturation Secret: Do not eat them yet! Place the finished macarons into a sealed container inside the refrigerator for 24 hours. During this resting phase, the moisture from the ganache seeps back into the interior of the shells, creating that legendary, ultra-soft, melt-in-your-mouth texture. Bring to room temperature 15 minutes before serving. Enjoy your exquisite creation!
Pair up your cooled macaron shells by matching them up with identical sizes.
Transfer your set pistachio ganache into a piping bag with a round tip. Pipe a generous, clean mound of ganache onto the flat side of one shell, then gently place the matching shell on top, twisting lightly until the ganache reaches the absolute edge of the perimeter.
The Drip Effect: Melt your remaining 100g of white chocolate with 20ml of cream and a single drop of green oil-based food color. Using a spoon or a small piping bag, carefully pipe a tiny amount along the top edge of the assembled macaron, encouraging it to drip naturally down the sides, exactly as displayed in the photograph.
Before the drip sets, crown the top of the macaron with your shaved white chocolate leaves, coarsely chopped toasted pistachios, and a tiny sprinkle of pistachio dust.