
The Ultimate Tuxedo Espresso-Mocha Mousse Entremet: A Masterclass in Layered Decadence
Section 1: Introduction and Culinary Philosophy
Welcome to the definitive guide to creating one of the most visually stunning and gastronomically sophisticated desserts in modern pastry arts: The Tuxedo Espresso-Mocha Mousse Entremet. Dessert is not merely the conclusion of a meal; it is an event, an emotional journey, and a canvas for artistic expression. When you gaze upon a perfectly structured slice of layered cake, you are looking at a harmonious marriage of chemistry, temperature management, texture contrast, and flavor balance.
This specific creation is born out of a deep-seated love for the complex, bitter, and comforting notes of roasted coffee beans combined with the rich, indulgent depth of premium chocolate. By structuring these elements into distinct, mathematically precise layers, we allow the palate to experience each flavor both individually and as a symphonic collective.
The art of the entremet—a classic French term for a multi-layered mousse cake—relies heavily on temperature control, structural integrity, and patience. In this masterclass, we will demystify the process entirely. We will strip away the intimidation factor often associated with high-end pastry work and guide you through every single phase of development. Whether you are an ambitious home baker looking to elevate your repertoire or a seasoned professional seeking to refine your technique, this recipe will provide the comprehensive, granular guidance you need to achieve absolute perfection.
Section 2: Deep-Dive Component Analysis
To build a masterpiece, one must fully understand its foundational components. This entremet is constructed from six unique layers and garnishes, each serving a vital structural and sensory purpose:
1. The Foundation: Flourless Mocha Sponge (Biscuit Sacher)
Every great structure needs a stable foundation. Instead of a traditional heavy flour-based sponge, we utilize an ultra-rich, moist flourless mocha sponge. Whipped egg whites provide the necessary lift, while melted dark chocolate and a touch of espresso powder ensure that the base layer is intensely flavorful and structurally sound enough to support the weight of the dense mousse layers above it.
2. The Mid-Core: Milk Chocolate Malted Mousse
Sitting just above the base is a light yet deeply comforting layer of milk chocolate mousse infused with malted milk powder. This layer acts as a transitional bridge. It softens the intense bitterness of the dark chocolate base and prepares the palate for the lighter, brighter flavors waiting in the upper tiers.
3. The Heart: White Chocolate Espresso Crémieux
Unlike a mousse, which is aerated with whipped cream or egg whites, a crémieux is dense, velvety, and intensely smooth—similar to a baked custard. By infusing premium white chocolate with freshly cracked espresso beans, we create a layer that delivers a powerful hit of coffee flavor wrapped in a silky, buttery texture that melts slowly and luxuriously on the tongue.
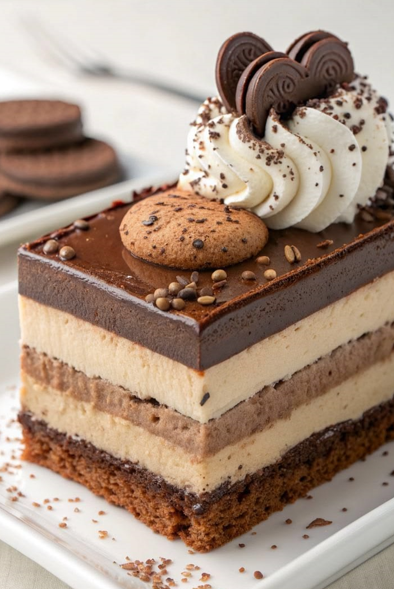
4. The Crown: Dark Chocolate Mirror Glaze & Ganache Top
The glossy, reflective surface at the very top of our entremet is a dark chocolate ganache glaze. It must be applied at precisely the right temperature ($32^\circ\text{C}$ to $35^\circ\text{C}$) to achieve a flawless, mirror-like sheen without melting the delicate mousse layers beneath it. It provides a sharp, bittersweet contrast to the sweeter elements below.
5. The Architecture: Whipped Vanilla Chantilly and Cookie Accents
Aesthetics matter. The top of the cake is adorned with a perfectly piped wave of high-fat vanilla bean Chantilly cream, dusted with cocoa nibs, and anchored by premium chocolate sandwich cookies and a soft-baked espresso macaron disc. This introduces a crucial element of crunch, breaking up the creamy textures of the inner layers.
Section 3: Professional Baking Science & Tips
Before measuring your ingredients, let us review the core scientific principles that ensure this entremet succeeds:
- Gelatin Hydration (Blooming): Gelatin is the structural glue of this dessert. Always bloom your gelatin powder in ice-cold water for at least 5 to 10 minutes before melting it. This ensures even hydration and prevents lumps.
- The Emulsion Process: When combining warm liquids with chocolate, you are creating an emulsion. Stir from the center outward in small, concentric circles using a rubber spatula to create a shiny, homogenous mixture without introducing excess air bubbles.
- Temperature Synchronicity: When folding whipped cream into a chocolate or custard base, ensure the base has cooled to approximately $30^\circ\text{C}$. If it is too hot, it will melt the fat in the whipped cream, causing the mousse to collapse. If it is too cold, the gelatin will set prematurely, creating a lumpy texture.
- Precision Freezing: To achieve the perfectly clean, sharp, razor-defined layers seen in the image, each layer must be blast-frozen or deeply chilled before the next layer is poured on top.
Section 4: Ingredients List
Note on Ingredients: For the absolute best results, use high-quality couverture chocolate with a high cocoa butter content rather than standard grocery store baking chips.
Part A: The Flourless Mocha Sponge Base
- 150g Dark Chocolate (70% Cocoa solids, chopped fine)
- 60g Unsalted Butter (High-fat European style, room temperature)
- 4 Large Egg Yolks (Room temperature)
- 5 Large Egg Whites (Perfectly clean, no yolk contamination)
- 80g Granulated White Sugar (Divided into two 40g portions)
- 15g Premium Instant Espresso Powder
- 2g Fine Sea Salt
- 10g Dark Dutch-Process Cocoa Powder (Sifted)
Part B: The White Chocolate Espresso Crémieux
- 200g Premium White Chocolate (32% Cocoa butter, chopped)
- 150ml Heavy Whipping Cream (36% Milk fat)
- 150ml Whole Milk (3.5% Fat)
- 4 Large Egg Yolks
- 40g Granulated Sugar
- 25g Whole Roasted Espresso Coffee Beans (Coarsely crushed)
- 4g Powdered Gelatin + 24ml Ice-Cold Water (For blooming)
Part C: The Milk Chocolate Malted Mousse
- 180g Milk Chocolate Couverture (38% Cocoa solids)
- 100ml Whole Milk
- 25g Malted Milk Powder
- 5g Powdered Gelatin + 30ml Ice-Cold Water (For blooming)
- 250ml Heavy Whipping Cream (Chilled, whipped to medium peaks)
Part D: The Dark Chocolate Ganache Glaze
- 120g Dark Chocolate (60% Cocoa solids)
- 100ml Heavy Whipping Cream
- 30g Light Corn Syrup or Liquid Glucose (For shine)
- 15g Unsalted Butter (Softened)
Part E: The Whipped Vanilla Chantilly Cream & Decoration
- 200ml Heavy Whipping Cream (Minimum 36% Fat, ice-cold)
- 30g Powdered Sugar (Sifted)
- 1 tsp Pure Vanilla Bean Paste (Showing real vanilla specks)
- 6-8 Premium Chocolate Sandwich Cookies (Oreos or similar)
- 4-5 Small Espresso Cookie Medallions or Macaron Shells
- 10g Cocoa Nibs or Dark Chocolate Flakes (For sprinkling)
- 5g Toasted Buckwheat Groats or Espresso Beans (For top garnishing)
Section 5: Step-by-Step Instructions
Step 1: Preparing the Flourless Mocha Sponge
- Preheat your conventional oven to $175^\circ\text{C}$ ($345^\circ\text{F}$). Line a standard rectangular baking sheet ($9 \times 13$ inches) with high-quality parchment paper. Lightly grease the paper.
- In a heatproof bowl set over a pot of gently simmering water (a bain-marie), melt the 150g of dark chocolate and 60g of unsalted butter together. Stir constantly until completely smooth. Remove from heat and stir in the espresso powder and sea salt. Let cool slightly.
- In a clean bowl, whisk the 4 egg yolks with 40g of granulated sugar until thick, pale, and ribbons form when the whisk is lifted. Gently fold this into the melted chocolate mixture.
- In the bowl of a stand mixer fitted with the whisk attachment, beat the 5 egg whites on medium speed until foamy. Gradually add the remaining 40g of sugar, one tablespoon at a time, increasing the speed to high until stiff, glossy peaks form.
- Gently fold one-third of the whipped egg whites into the chocolate mixture to lighten it. Sift the cocoa powder over the top, then gently fold in the remaining egg whites using a rubber spatula in a figure-eight motion. Do not overmix, or you will lose the aeration.
- Pour the batter onto your prepared baking sheet, smoothing it into an even layer with an offset spatula. Bake for 12 to 15 minutes until the top is set and springs back lightly to the touch. Remove from the oven and let cool completely. Once cool, cut out a clean rectangle that perfectly fits the base of your deep rectangular entremet mold. Place the sponge at the bottom of the mold.
Step 2: Crafting the White Chocolate Espresso Crémieux
- Bloom the 4g of gelatin powder in 24ml of cold water. Set aside.
- In a saucepan, combine the 150ml of heavy cream, 150ml of whole milk, and the 25g of coarsely crushed espresso beans. Bring to a gentle simmer over medium heat, then remove from the stove, cover with a lid, and let the coffee steep for 20 minutes to extract the rich oils and aromas.
- After 20 minutes, strain the cream mixture through a fine-mesh sieve to remove all coffee bean fragments. Return the liquid to the saucepan and bring back to a bare simmer.
- In a separate bowl, whisk the 4 egg yolks and 40g of sugar together. Slowly pour a thin stream of the warm coffee-infused cream into the yolks while whisking constantly to temper them. Pour the entire mixture back into the saucepan.
- Cook over low heat, stirring continuously with a spatula, until the custard thickens slightly and reaches $82^\circ\text{C}$ ($180^\circ\text{F}$), or coats the back of a spoon. Do not boil. Remove from heat.
- Add the bloomed gelatin to the hot custard and stir until completely dissolved. Pour the hot custard over the 200g of chopped white chocolate. Let sit for 2 minutes, then blend with an immersion blender until perfectly smooth, glossy, and emulsified.
- Pour this warm crémieux directly over the prepared mocha sponge layer inside the mold. Place the mold into the freezer for at least 2 hours until firmly set.
Step 3: Whipping the Milk Chocolate Malted Mousse
- Bloom the 5g of gelatin in 30ml of cold water.
- In a small saucepan, heat the 100ml of whole milk and 25g of malted milk powder until hot and the powder is fully dissolved. Add the bloomed gelatin and stir until melted.
- Pour the hot milk over the 180g of milk chocolate couverture. Let sit for 1 minute, then stir dynamically until an ultra-smooth, uniform emulsion forms. Allow this mixture to cool to roughly $30^\circ\text{C}$ at room temperature.
- In a chilled bowl, whip the 250ml of heavy cream until it reaches medium peaks (it should hold its shape but still look soft and silky).
- Gently fold the whipped cream into the cooled milk chocolate base in three separate additions. Work gently to preserve the fluffy, aerated structure.
- Retrieve your mold from the freezer (ensure the white chocolate espresso layer is completely firm). Pour the milk chocolate malted mousse over the top, leveling it off beautifully with a clean offset spatula. Return the entire assembly to the freezer for an additional 3 hours.
Step 4: Applying the Mirror-Sheen Dark Chocolate Ganache Glaze
- In a heatproof bowl, combine 120g of dark chocolate, 100ml of heavy cream, and 30g of corn syrup/glucose.
- Melt the mixture over a water bath or in short intervals in a microwave, stirring gently to prevent creating air bubbles. Once melted, stir in the 15g of softened butter until a highly reflective, glossy glaze forms.
- Allow the glaze to cool until it reaches $32^\circ\text{C}$ to $34^\circ\text{C}$.
- Take the frozen entremet out of the freezer. Pour the glaze evenly over the top layer of mousse. Quickly tilt the mold or use a warm palette knife to sweep away excess glaze before it sets, creating a perfectly flat, glass-like top layer. Place it back in the refrigerator for 30 minutes to allow the glaze to set.
Step 5: Final Presentation, Piping, and Decoration
Slicing Perfection: To serve, use a long, sharp chef’s knife dipped in boiling hot water and wiped completely dry before every single cut. This melts the chocolate glaze and mousse layers just enough to create an absolute picture-perfect, pristine slice. Enjoy your masterfully crafted culinary creation!
To De-mold: Gently warm the sides of your metal rectangular pastry mold using a kitchen blowtorch or by wrapping it in a warm, damp towel. Slowly slide the mold upward to reveal the clean, sharp, immaculate layers of your entremet. Place the cake onto your final serving platter.
The Chantilly Wave: In a cold bowl, whip 200ml of heavy cream, 30g of powdered sugar, and 1 tsp of vanilla bean paste until stiff, structured peaks form. Transfer the cream into a pastry bag fitted with a large Saint-Honoré piping tip or a wide star tip. Pipe a beautiful, continuous, dramatic wave of cream along the upper-right edge of the cake length.
The Final Accents: Carefully nestle your decorative chocolate sandwich cookies into the back of the vanilla Chantilly wave. Place a soft-baked espresso cookie or macaron disc directly onto the center of the dark chocolate glaze. Scatter toasted buckwheat groats, espresso bean fragments, and a delicate dusting of cocoa nibs along the top of the glaze and around the base of the plate to match the gorgeous visual aesthetic of the photograph.