

The Ultimate Guide to the Ultimate Breakfast: Recipes, History, and the Anatomy of a Perfect Morning Feast
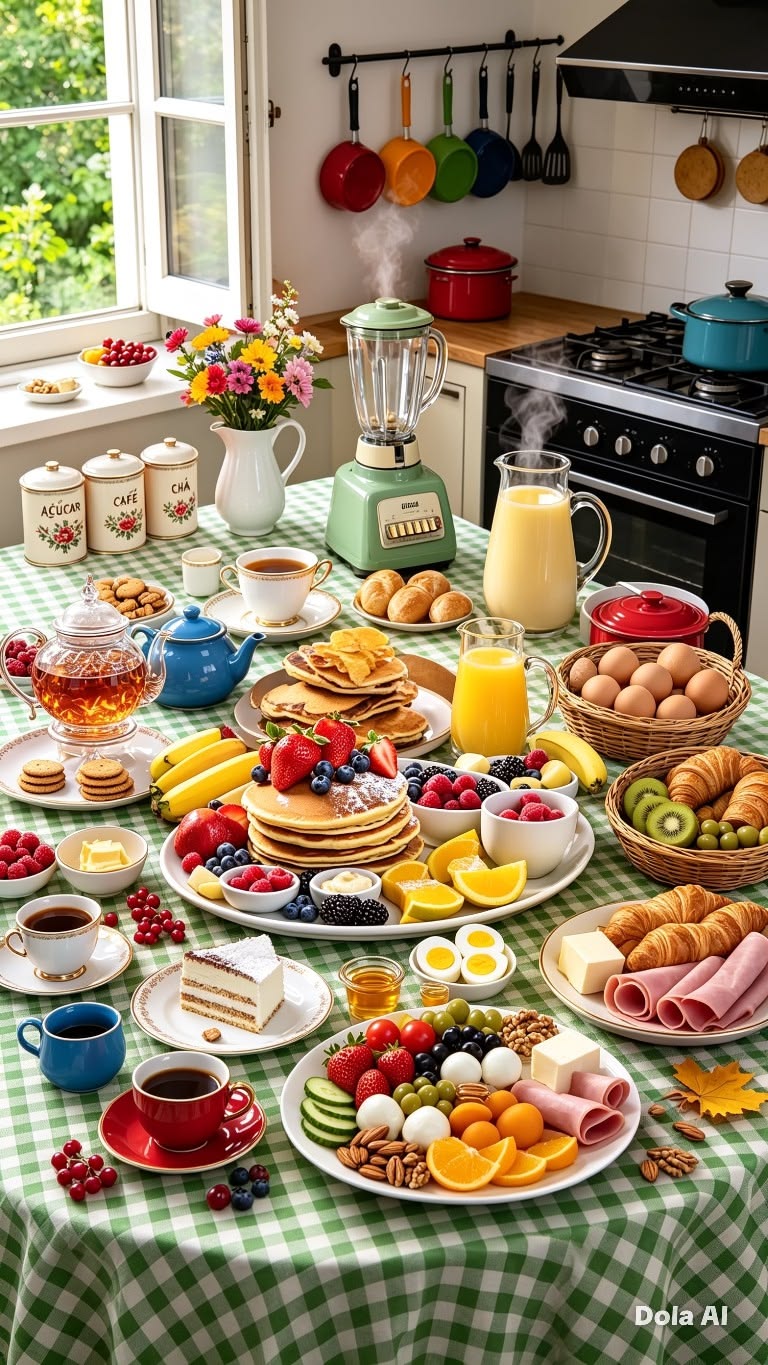
Breakfast is frequently heralded as the most important meal of the day. Across cultures, generations, and continents, the act of breaking the overnight fast serves as a cornerstone of human culinary tradition. When we think of a landmark breakfast—one that promises complete satisfaction and absolute comfort—we often visualize a spread identical to the vibrant, hearty breakfast platter featured in Screenshot 2026-06-07 040308.jpg. This comprehensive, encyclopedic guide will dive deep into every single element of that quintessential morning feast.
We will explore the history, cultural relevance, step-by-step culinary techniques, nutritional profiles, and science behind creating a perfect breakfast. From the golden fluffiness of buttermilk pancakes to the savory sizzle of artisanal sausages and cured bacon, the crisp texture of French toast, the creamy perfection of scrambled eggs, the bright burst of fresh seasonal berries, and the refreshing pairing of freshly squeezed orange juice—this guide covers it all. Whether you are a home cook looking to master your weekend brunch game or a culinary enthusiast seeking to understand the historical context of your morning favorites, this definitive resource is designed for you.
Part 1: The Culinary Philosophy of the Breakfast Platter
To understand why a breakfast plate like the one shown in Screenshot 2026-06-07 040308.jpg holds such an iconic status worldwide, we must first look at the sensory harmony of food. A great breakfast is not just a random collection of calories; it is a carefully balanced interplay of textures, flavors, temperatures, and macronutrients.
Flavor Profiles in Balance
The human palate thrives on contrast. A premium breakfast platter succeeds because it incorporates the five primary tastes:
- Sweet: Found in the fluffy pancakes, the maple syrup or honey glaze, and the natural sugars of fresh berries.
- Salty: Provided by the cured bacon and seasoned sausages, which balance out the sweeter components.
- Sour/Acidic: Delivered through the fresh orange juice and the tartness of raspberries and blackberries, cutting through the heavy fats of the meal.
- Umami: The deep, savory richness found in properly cooked eggs, seared sausages, and crispy bacon.
- Bitter: Subtle undertones often present in high-quality maple syrups or the seeds of berries, providing complexity.
Structural Textures
A monotonous meal tires the jaw and the brain. The breakfast feast solves this by offering a symphony of textures:
- Crispiness: The shattering crunch of perfectly rendered bacon strips.
- Fluffiness: The pillowy, cloud-like interiors of buttermilk pancakes.
- Creaminess: Velvety, soft-curd scrambled eggs that melt in the mouth.
- Chewiness/Juiciness: Plump, well-seared breakfast sausages that snap when bitten.
- Firmness & Snappiness: Fresh blueberries and strawberries that pop with juices when consumed.
By understanding how these elements interact, a cook transforms simple morning ingredients into a restaurant-quality gastronomic experience.
Part 2: Deep Dive into Pancakes – The Golden Disc of Comfort
Pancakes are arguably the most universally beloved breakfast item. While they appear simple, achieving the exact color and texture profile of the pancakes seen in the middle of Screenshot 2026-06-07 040308.jpg requires an understanding of basic kitchen chemistry.
The History of the Pancake
Pancakes have prehistoric roots. Archaeological evidence suggests that early human societies ground wild grains, mixed them with water, and baked the paste on hot, flat stones. The ancient Greeks and Romans ate a version called alita dolcia (“another sweet”), made from wheat flour, olive oil, honey, and curdled milk.
In medieval Europe, pancakes were traditional fare on Shrove Tuesday (Pancake Tuesday), serving as a practical way to use up perishable fats, eggs, and dairy before the fasting period of Lent. The American iteration—thick, fluffy, and leavened with baking powder or baking soda—evolved during the 19th century, cementing its place as a staple of New World breakfast culture.
The Science of Fluffiness
The fluffy texture of an American pancake relies on gas retention within a gluten network. Two primary chemical reactions dictate this process:
- The Acid-Base Reaction: Traditional buttermilk contains lactic acid. When mixed with baking soda (sodium bicarbonate), a chemical reaction occurs instantly, producing carbon dioxide gas (CO2). This gas creates tiny bubbles within the wet batter.
- Thermal Expansion: When the batter hits a hot griddle, the trapped carbon dioxide gas expands. Simultaneously, the water content in the batter turns to steam, pushing the dough upward, while the proteins in the egg and flour coagulate to lock that airy structure into place.
Master Buttermilk Pancake Recipe
To replicate the perfectly browned, airy pancakes from the visual reference, use the following professional-grade recipe.
Ingredients
- Dry Ingredients:
- 250 grams All-Purpose Flour (provides the ideal gluten structure without turning tough)
- 30 grams Granulated Sugar (assists in the Maillard reaction for beautiful browning)
- 10 grams Baking Powder
- 5 grams Baking Soda
- 4 grams Fine Sea Salt
- Wet Ingredients:
- 350 milliliters Real Buttermilk (shaken well)
- 60 grams Unsalted Butter (melted and cooled slightly)
- 2 Large Eggs (room temperature, separated)
- 5 milliliters Pure Vanilla Extract
Step-by-Step Execution
- Sift and Whisk Dry Components: In a large bowl, combine the flour, sugar, baking powder, baking soda, and salt. Whisk vigorously for at least 30 seconds to ensure even distribution of the leavening agents.
- Prepare the Wet Emulsion: In a separate container, whisk together the buttermilk, melted butter, egg yolks, and vanilla extract.
- Whip the Egg Whites (The Secret Step): In a clean bowl, whip the reserved egg whites until soft peaks form. Folding these into the batter at the very end guarantees an unparalleled lightness.
- Combine with Care: Pour the wet mixture into the dry ingredients. Use a silicone spatula to fold the mixture gently. Stop mixing while there are still lumps remaining. Over-mixing activates the gluten, resulting in a rubbery, tough pancake rather than a tender one. Fold in the whipped egg whites last.
- Preheat the Griddle: Heat a heavy cast-iron skillet or non-stick griddle over medium heat. The surface temperature should be around 190°C (375°F). Test by dropping a few drops of water on the surface; they should dance and evaporate.
- Grease Mindfully: Lightly wipe the pan with a paper towel dipped in clarified butter or neutral oil. Avoid excess pooling, which causes uneven, mottled browning.
- The Pour and Flip: Ladle approximately 60 milliliters (1/4 cup) of batter per pancake. Watch the surface closely. Bubbles will form and begin to pop, leaving tiny holes. The edges will look matte and slightly set. This takes roughly 2 to 3 minutes.
- The Flip: Slide a thin spatula underneath and flip in one quick, confident motion. Cook the reverse side for another 60 to 90 seconds until golden brown. Never press down on the pancake with your spatula, as this deflates the trapped air pockets.
Part 3: The Art of Savory Meats – Bacon and Sausages
As seen on the lower portion of the plate in Screenshot 2026-06-07 040308.jpg, caramelized, savory breakfast meats ground the meal, balancing out the sugars of the pancakes and syrups.
Crispy Cured Bacon: Sizzling Perfection
Bacon undergoes a profound transformation when exposed to heat, driven by fat rendering and the Maillard reaction—a chemical reaction between amino acids and reducing sugars that gives browned food its desirable flavor.
Oven-Baking vs. Skillet Methods
While traditionalists prefer the cast-iron skillet, culinary professionals frequently use the oven method for large batches because it yields uniform crispness and minimal curling.
| Metric / Attribute | Skillet Method | Oven-Baking Method |
|---|---|---|
| Consistency | Variable; hot spots lead to uneven cooking. | Highly uniform; heat surrounds the meat. |
| Texture | Chewy in parts, crispy in others. | Perfectly shattered crispiness throughout. |
| Clean-up | High grease splatter on stovetop. | Contained entirely within a lined baking sheet. |
| Active Attention | Constant flipping and monitoring required. | Hands-off; requires minimal supervision. |
The Definitive Oven-Baking Guide
- Arrange cold, thick-cut bacon slices in a single layer on a baking sheet lined with heavy-duty aluminum foil or parchment paper. Ensure the slices do not overlap.
- Place the baking sheet into a cold oven. Turning the heat on after placing the bacon inside allows the fat to render slowly as the temperature rises, resulting in a crispier texture.
- Set the temperature to 200°C (400°F).
- Bake for 18 to 22 minutes, depending on the thickness of the cut. Keep a close watch during the final 3 minutes as the sugars in cured bacon can turn from perfectly caramelized to burnt quickly.
- Remove immediately from the oven and transfer the strips to a plate lined with paper towels to drain excess fat. The bacon will continue to crisp as it cools down.
The Perfect Breakfast Sausage Link
The breakfast sausage links pictured on the bottom right of Screenshot 2026-06-07 040308.jpg display a beautiful, glossy glaze and a deeply seared casing.
Understanding the Snapping Texture
A high-quality sausage relies on a proper meat-to-fat ratio—ideally 70% lean pork shoulder to 30% pork fatback. The distinct “snap” when you bite into a premium link is achieved by using natural collagen or cellulose casings combined with precise cooking techniques that build steam pressure inside the casing without bursting it.
The Combination Cooking Technique (Steam-to-Sear)
To achieve a juicy interior along with an evenly browned exterior without charring, follow this method:
- Place the sausage links in a cold skillet. Add 3 to 4 tablespoons of water—just enough to cover the bottom of the pan.
- Cover the skillet with a tight-fitting lid and turn the heat to medium. Let the water come to a simmer. This steams the sausages, ensuring the raw pork is cooked thoroughly to a safe internal temperature of 71°C (160°F).
- After 5 to 6 minutes, remove the lid. The water will quickly evaporate, leaving behind the rendered fats from the sausages.
- Allow the sausages to fry in their own rendered fat. Turn them frequently with tongs to ensure uniform browning across all sides. The casing will crisp up, taking on a deep, rich mahogany color within 4 to 5 minutes.
Part 4: French Toast – The Golden-Brown Custard Slice
To the right of the pancakes in Screenshot 2026-06-07 040308.jpg sits beautifully prepared French toast. This dish transforms stale bread into an elegant, custard-like breakfast staple.
Historical Context: Pain Perdu
French toast was not invented in France. Recipes dates back to the Roman Empire, where a dish known as aliter dulcia involved dipping bread in milk and beaten egg, frying it in oil, and drizzling it with honey.
The French phrase for this dish is pain perdu, which translates literally to “lost bread.” It was a frugal kitchen technique designed to reclaim stale, hard loaves of bread that would otherwise be discarded. When soaked in an egg-and-milk mixture, the dry starch cells rehydrate, turning a tough loaf into a decadent meal.
Selecting the Ultimate Bread
The foundational element of French toast is the bread. Standard white sandwich bread is too thin and structurally weak, quickly disintegrating when soaked. For premium results, choose one of these three options:
- Brioche: A highly enriched French bread packed with butter and egg yolks. It yields an incredibly soft, rich, dessert-like texture.
- Challah: An enriched Jewish bread similar to brioche but made without dairy (using oil instead). It features a tight crumb structure that absorbs custard beautifully while holding its shape.
- Texas Toast: A thick-cut white bread with a sturdy crumb that provides a classic diner-style presentation.
Crafting the Ideal Custard Base
The soaking liquid should be treated as a pourable custard, requiring a precise ratio of eggs to dairy to avoid an overtly sulfurous, “eggy” taste or a soggy center.
The Golden Custard Ratio
For every 4 thick slices of bread, combine:
- 2 Large Eggs
- 120 milliliters Whole Milk
- 60 milliliters Heavy Cream (adds fat for a silkier mouthfeel)
- 15 grams Granulated Sugar
- 2 grams Ground Cinnamon
- 2 milliliters Pure Vanilla Extract
- A pinch of fine salt (essential to balance the sweetness)
Execution Strategy
- Dry the Bread: Slice your bread thick—roughly 2 to 3 centimeters. If the bread is fresh, lay the slices on a wire rack and bake them at 150°C (300°F) for 10 minutes to dry them out slightly. This creates space within the starch matrix to absorb the custard.
- Whisk Thoroughly: Whisk the eggs and sugar until completely homogenous before incorporating the milk, cream, and spices. This prevents stray bits of egg white from cooking separately on the surface of your toast.
- The Soak: Submerge each slice of bread in the custard for 20 to 30 seconds per side (for dense breads like challah or brioche). The bread should feel heavy and saturated but not structurally compromised.
- The Griddle Step: Melt equal parts butter and neutral vegetable oil in a skillet over medium-low heat. The oil raises the smoke point, preventing the butter solids from burning.
- Cook Slowly: Fry for about 3 to 4 minutes on the first side. Adjust the heat to prevent the exterior from browning before the interior custard fully cooks through. Flip and cook for another 3 minutes until both sides are golden brown and puff up slightly, signaling that the interior eggs have cooked and stabilized.
Part 5: The Science of Perfect Scrambled Eggs
Positioned beautifully on the left side of the platter in Screenshot 2026-06-07 040308.jpg are soft, bright yellow scrambled eggs. Egg cookery is one of the truest tests of a chef’s technical skill, requiring precise heat control to avoid drying out the proteins.
Protein Denaturation and Coagulation
Egg whites and yolks are made up of water and tightly folded, ball-like proteins. When you apply heat, these proteins vibrate, unfold (denature), and bump into one another, forming a three-dimensional web that traps the water inside. This process is known as coagulation.
If heat is applied too quickly or for too long, the protein web tightens too much, squeezing out the trapped water like a wrung-out sponge. This results in dry, rubbery curds sitting in a puddle of water.
Choosing Your Style: American vs. French Scrambled
Depending on personal preference, scrambling techniques generally fall into two distinct styles:
1. The American Style (Large, Soft Curds)
This style matches the presentation in Screenshot 2026-06-07 040308.jpg.
- Method: Whisk eggs vigorously with a pinch of salt until completely uniform in color. Heat a non-stick pan over medium-low heat and melt a tablespoon of butter. Pour in the eggs. Let them sit untouched for 10 seconds until a thin layer sets at the bottom. Using a silicone spatula, gently sweep the eggs from the outer edges toward the center. This forms large, delicate, folded curds.
- The Finish: Remove the pan from the heat source when the eggs look shiny and slightly undercooked. Residual heat will finish cooking them on the way to the plate.
2. The French Style (Small, Custard-like Curds)
- Method: Whisk eggs cold and place them directly into a cold saucepan with cold pieces of butter. Set the pan over low heat. Stir continuously with a whisk or spatula, scraping the bottom and sides. Move the pan on and off the flame every 30 seconds to meticulously regulate the temperature.
- The Finish: Once a thick, spreadable porridge-like texture forms, stir in a spoonful of cold heavy cream or crème fraîche to stop the cooking process instantly.
Part 6: The Refreshing Accompaniments – Berries and Citrus
No heavy breakfast platter is complete without a fresh element to cleanse the palate. The visual layout in Screenshot 2026-06-07 040308.jpg utilizes fresh strawberries, raspberries, blueberries, and a glass of orange juice to balance the rich fats of the meats and eggs.
Fresh Berry Melange: Textures and Antioxidants
Berries provide a bright pop of color and necessary acidity to the meal.
- Strawberries: Provide an abundance of Vitamin C and sweet-tart notes. For clean presentation, leave the green calyx intact if serving whole, or slice them cleanly from apex to base.
- Raspberries and Blackberries: These aggregate fruits offer a delicate, velvet texture and intense tanginess. Their internal hollow structure makes them fragile, meaning they should be washed gently right before serving to prevent sogginess.
- Blueberries: Crisp skin provides a pleasant pop in the mouth. They are rich in anthocyanins—antioxidants that give them their distinct deep blue hue.
Freshly Squeezed Orange Juice: The Liquid Gold
The tall glass of orange juice anchoring the top of the image provides a sharp contrast to the meal.
The Chemistry of Fresh vs. Pasteurized Juice
Store-bought, shelf-stable orange juice undergoes pasteurization—a heat treatment designed to kill bacteria and extend shelf life. Unfortunately, this process breaks down volatile flavor compounds and degrades enzymes, altering the fresh taste of the fruit. Brands often use “flavor packs” to artificially recreate the lost orange profile.
Freshly squeezed orange juice retains all its natural, delicate esters, enzymes, and oils from the orange skin. For the ultimate breakfast experience, choose high-juice varieties like Valencia or Navel oranges. Keep the juice cold, and serve it immediately after squeezing to prevent the bitter flavor compounds (limonin) from developing via oxidation.
Part 7: Structural Plating, Organization, and Timing
To serve a grand breakfast where everything is hot and perfectly textured at the exact same moment requires organized kitchen management. Cold pancakes or lukewarm eggs can ruin a beautifully prepared meal.
The Master Kitchen Timeline
Follow this step-by-step timeline to coordinate your cooking schedule and ensure every item finishes at the same time:
- 30 Minutes Before Serving (T-30): Complete your preparation work. Slice the bread for French toast, wash and dry the fresh berries, whisk your dry and wet pancake ingredients separately, and prepare your egg custard base.
- T-20 Minutes: Arrange the bacon slices on your baking sheet and slide them into a cold oven. Set the temperature to 200°C (400°F).
- T-15 Minutes: Squeeze your fresh oranges. Pour the juice into glassware and place it in the refrigerator to chill.
- T-12 Minutes: Start cooking your sausages using the steam-to-sear method.
- T-08 Minutes: Heat your griddles. Combine your wet and dry pancake ingredients, then pour the batter onto the griddle. At the same time, dip your bread into the custard and cook your French toast.
- T-04 Minutes: Check on your bacon and sausages. Transfer them to a paper towel-lined wire rack. Place this rack into a warm holding oven set to 90°C (195°F), along with your cooked pancakes and French toast, to keep everything warm.
- T-03 Minutes: Whisk your fresh eggs and scramble them gently over low heat. This step is saved for last because eggs cool down and lose their ideal texture faster than any other item on the plate.
- T-00 Minutes (Serving Time): Pull your warm plates from the holding oven. Arrange the fluffy pancakes and custardy French toast in the center, tuck the crispy bacon and glistening sausages alongside them, spoon the warm scrambled eggs into any open space, scatter the fresh berries across the platter, and pull the chilled orange juice from the fridge.
Visual Presentation Rules
When recreating the layout shown pay close attention to structural balance:
- The Base Layer: Use a large, neutral-toned ceramic platter to let the vibrant colors of the food stand out.
- Cascading Technique: Overlap the pancakes and French toast slightly in the center to create height and dimension.
- Color Separation: Position the bright yellow scrambled eggs opposite the dark blueberries and deep-red strawberries. This separation prevents bleeding from the fruit juices into the eggs while making each component visually distinct.
- Condiment Placement: Place small ramekins of maple syrup, honey, or fruit preserves directly on the plate to manage portion control and keep the dry components from getting soggy before serving.
Part 8: Comprehensive Nutritional Matrix
A lavish breakfast feast is undeniably rich, providing a substantial dose of macronutrients to power a busy day. Understanding the nutritional breakdown helps you balance the meal within a healthy, well-rounded lifestyle.
Below is an approximate nutritional breakdown for a single, full-sized serving of this breakfast feast, assuming standard restaurant-style portion sizes:
| Food Item | Portion Size | Calories (kcal) | Protein (g) | Carbohydrates (g) | Fat (g) | Key Micronutrients |
|---|---|---|---|---|---|---|
| Buttermilk Pancakes | 2 Medium (120g) | 280 | 7 | 45 | 8 | Calcium, Iron, B-Vitamins |
| French Toast | 1 Thick Slice (90g) | 240 | 8 | 32 | 9 | Vitamin A, Folate |
| Crispy Cured Bacon | 2 Strips (30g) | 110 | 6 | 0.5 | 9 | Sodium, Selenium, Phosphorus |
| Breakfast Sausages | 2 Links (60g) | 190 | 9 | 1 | 16 | Thiamin, Zinc, Vitamin B12 |
| Scrambled Eggs | 2 Large Eggs (100g) | 150 | 12 | 1 | 10 | Choline, Riboflavin, Vitamin D |
| Mixed Fresh Berries | 1/2 Cup (75g) | 40 | 0.5 | 9 | 0.2 | Vitamin C, Potassium, Fiber |
| Fresh Orange Juice | 1 Glass (250ml) | 110 | 2 | 26 | 0.5 | Vitamin C, Folate, Potassium |
| Maple Syrup | 2 Tablespoons (30ml) | 100 | 0 | 26 | 0 | Manganese, Zinc |
| TOTAL ESTIMED VALUE | Full Feast Spread | 1,220 | 44.5 | 140.5 | 61.7 | High Nutrient Density |
While this classic feast is higher in sodium and fats than a standard weekday meal, it offers an exceptional amount of high-quality protein (44.5 grams) to support muscle health and satiety. It also delivers a potent dose of daily vitamins, particularly Vitamin C from the fresh citrus and fruit components, along with essential minerals like zinc, selenium, and choline from the eggs and meats.
Part 9: Frequently Asked Questions (FAQ)
Can I make pancake batter the night before?
It is not recommended to mix pancake batter ahead of time if you are using chemical leaveners like baking powder and baking soda. The moment wet ingredients touch the dry ones, the acid-base reaction activates and carbon dioxide gas begins to escape. If left overnight in the refrigerator, the batter will lose its lifting power, resulting in flat, dense, rubbery pancakes. If you want to save time in the morning, mix your dry ingredients together in a sealed container and combine your wet ingredients in another container overnight. Simply fold them together right before cooking.
Why do my breakfast sausages keep bursting open while frying?
Sausages usually split or burst open because they are cooked over high heat too quickly. The moisture inside the sausage turns to steam rapidly, building up immense pressure before the outer casing has a chance to stretch and cook. By adopting the combination cooking method detailed in Part 3—steaming the sausages in a small amount of water under a lid before searing them—you ensure the interior cooks through evenly and safely, preventing the casing from bursting.
How do I prevent my French toast from becoming soggy in the middle?
Soggy French toast is typically caused by two common mistakes: using fresh, soft bread that breaks down instantly, or leaving the bread in the custard soak for too long. To fix this, always use sturdy, thick-cut bread (2 to 3 cm) that is slightly stale or dried out in a warm oven beforehand. This ensures the bread can absorb the liquid without losing its structure. Additionally, make sure to fry over medium-low heat so the interior custard has enough time to cook through and set perfectly by the time the outside turns golden brown.
What is the purpose of adding salt to scrambled eggs before cooking?
Salting your eggs 15 minutes before cooking acts as a natural texture enhancer. Salt breaks down some of the tight bonds between the egg proteins, preventing them from over-coagulating and binding too closely when heated. This simple step helps your scrambled eggs stay tender and retain moisture, minimizing the risk of drying them out or pushing out water during cooking.
What is the best way to keep food warm while finishing other items?
Avoid stacking your cooked foods directly on top of each other on a cold plate, as the trapped steam will make everything soggy. Instead, set a clean wire cooling rack inside a rimmed baking sheet and place it in an oven preheated to 90°C (195°F). As you finish cooking your bacon, sausages, pancakes, and French toast, spread them out in a single layer on the wire rack. The warm air will circulate freely around the food, keeping it hot and beautifully crisp until you are ready to plate and serve everything.