

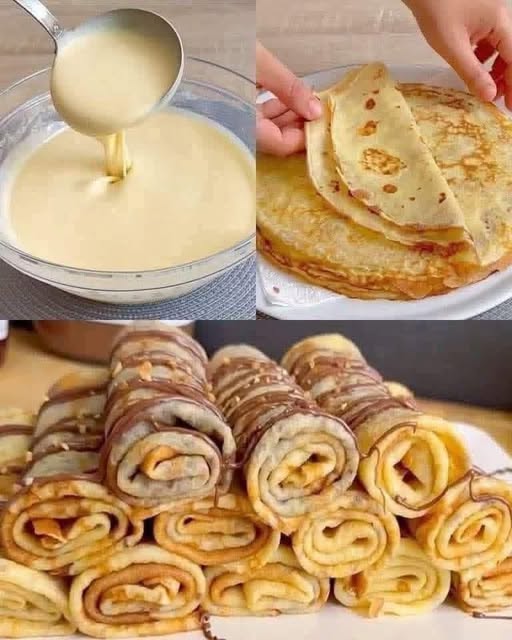
The Ultimate French Crepes Masterclass: From Perfect Batter to Decadent Rolled Platters
Section 1: Introduction and Culinary Philosophy
There is something deeply comforting yet undeniably elegant about a perfectly made French crepe. Unlike heavy American pancakes, a true crepe is paper-thin, incredibly delicate, and boasts beautifully lacey, golden-brown edges. It serves as the ultimate blank canvas in the pastry world—pliable enough to fold, roll, or stack, and subtle enough to complement everything from fresh fruit to rich chocolate hazelnut spreads.
Making the perfect crepe is not a matter of luck; it is a masterclass in hydration, gluten development, and heat management. If your crepes turn out rubbery, thick, or tear easily in the pan, it usually comes down to small errors in the batter ratio or resting time. In this comprehensive guide, we will break down the precise fluid mechanics of a flawless crepe batter. We will guide you through getting that smooth, velvety consistency, achieving the perfect swirl in a hot pan, and assembling a beautiful platter of rolled crepes drizzled with warm chocolate and crushed toasted nuts, just like the classic presentation.
Section 2: Deep-Dive Component Analysis
To build an impressive, restaurant-quality crepe platter, we must master three distinct phases:
1. The Liquid Gold: Velvety Crepe Batter
The ideal crepe batter has the viscosity of heavy cream or half-and-half, rather than a thick cake batter. It relies on a high ratio of liquid (milk and eggs) to flour. Incorporating melted butter directly into the wet mixture adds richness and provides a built-in non-stick property, ensuring the crepes slide effortlessly out of the pan.
2. The Cook: Lacey, Golden Discs
Cooking a crepe requires swift hand coordination. The pan must be preheated to precisely the right temperature—hot enough to instantly set the batter when swirled, but cool enough that it doesn’t cook before covering the entire surface. The result should be a disk so thin you could almost read a newspaper through it, marked by beautiful, golden leopard spots.
3. The Assembly: The Rolled and Drizzled Platter
Presentation transforms simple home cooking into an experience. By spreading a thin, even layer of premium spread inside each warm crepe, rolling them tightly into neat cylinders, and stacking them into a beautiful pyramid structure, you maximize visual appeal. A final artistic zigzag of warm hazelnut cocoa spread and a shower of finely chopped praline or peanuts creates a perfect balance of textures.
Section 3: Professional Crepe Science & Tips
- The Gluten Rest Phase (Crucial): Never cook crepe batter immediately after blending. Mixing develops gluten networks in the flour, and trapping air bubbles makes the final texture tough. Letting the batter rest in the refrigerator for at least 30 minutes (or overnight) allows the starch granules to fully absorb the liquid and relaxes the gluten, ensuring your crepes are incredibly tender and melt-in-your-mouth soft.
- The First Crepe Sacrificial Rule: In the pastry world, it is widely accepted that the first crepe is always a throwaway. It acts as a test run to regulate the surface temperature of your pan and evenly distribute the thin layer of fat. Adjust your burner heat based on how the first one browns.
- The Lacing Effect: To get those gorgeous, crispy lace edges seen on premium crepes, ensure your skillet is lightly brushed with butter rather than pooled with oil. Too much fat causes the batter to fry and slide around in clumps instead of spreading smoothly.
Section 4: Ingredients List
Part A: The Master Crepe Batter (Yields approx. 12-15 crepes)
- 250g All-Purpose Flour (Sifted)
- 3 Large Eggs (Room temperature)
- 500ml Whole Milk (Slightly warm or room temperature, never ice-cold)
- 50g Unsalted Butter (Melted and cooled slightly)
- 2 tbsp Granulated White Sugar (For sweet crepes)
- 1 tsp Pure Vanilla Extract
- ¼ tsp Fine Sea Salt
Part B: The Fillings & Decorative Toppings
- 1 Cup Premium Chocolate Hazelnut Spread (Nutella or similar alternative)
- ½ Cup Toasted Peanuts, Hazelnuts, or Walnuts (Finely chopped)
- 1 tbsp Unsalted Butter (Kept aside for lightly greasing the pan)
Section 5: Step-by-Step Instructions
Step 1: Blending the Perfect Batter
- The Blender Method (Recommended for zero lumps): Add the 500ml of whole milk, 3 large eggs, melted butter, vanilla extract, sugar, and sea salt directly into a high-speed blender. Pulse for 5 seconds to combine. Add the 250g of sifted flour on top, cover, and blend on high speed for exactly 15 to 20 seconds until perfectly smooth and frothy.
- The Hand-Whisk Method: If making by hand, sift the flour into a large bowl and make a well in the center. In a separate pitcher, whisk the eggs, milk, and vanilla together. Slowly pour the wet ingredients into the well of flour, whisking from the center outward in small circles to avoid lumps. Whisk in the melted butter and salt last. Pass the batter through a fine-mesh strainer to catch any stray lumps.
- The Rest: Cover the bowl or blender pitcher with plastic wrap and chill it in the refrigerator for a minimum of 30 minutes.
Step 2: The Art of the Pan Swirl
- Heat a 20cm to 24cm non-stick crepe pan or skillet over medium heat.
- Lightly dip a paper towel in a small amount of butter and rub it across the hot pan to create an incredibly thin film of fat.
- Give your rested batter a quick stir. Lift the hot pan completely off the burner with one hand and pour a small ladleful (about 45ml to 60ml) of batter directly into the center of the tilted pan.
- Instantly rotate and tilt your wrist in a circular motion to cascade the batter across the entire bottom of the pan in a thin, uniform sheet. Work quickly before the batter sets!
Step 3: Flipping with Precision
- Place the pan back onto the medium heat. Cook undisturbed for about 60 to 90 seconds. You will see the edges turn golden brown, curl up slightly, and loosen from the pan.
- Slide a thin, heat-resistant rubber spatula gently under the edge of the crepe to ensure it’s free.
- Using your fingers or the spatula, quickly lift the crepe and flip it over to the second side. Cook for a brief 20 to 30 seconds just to create beautiful light-golden spots on the reverse side.
- Slide the cooked crepe out of the pan onto a large plate lined with parchment paper. Repeat the process with the remaining batter, stacking the finished crepes directly on top of each other to trap residual steam, which keeps them soft and pliable.
Step 4: Rolling and Constructing the Platter
- Lay a single warm crepe flat on your clean workspace or cutting board with the prettiest “leopard-spotted” side facing down.
- Use an offset spatula to spread a thin, uniform layer of chocolate hazelnut spread across the top surface, leaving a small 1cm margin around the border clean.
- Starting from the edge closest to you, roll the crepe up tightly into a clean, uniform cylinder. Repeat this process for all your crepes.
- Cut the rolled crepes cleanly in half at a slight diagonal angle if you prefer shorter bites, or leave them whole. Neatly stack the rolled cylinders onto your final serving platter in a beautiful tiered pyramid configuration.
Step 5: The Final Presentation Garnish
Generously shower the chocolate lines with your finely chopped toasted nuts for that essential, professional crunchy finish. Serve immediately while warm and decadent!
Warm up 3 to 4 tablespoons of chocolate hazelnut spread in a small heatproof bowl in the microwave for 15 seconds so it flows smoothly.
Transfer the warm chocolate into a small parchment paper piping cone or use a fork to rapidly swing back and forth over the stacked crepes, creating a gorgeous zigzag drizzle pattern across the top of the platter.